


Of all the guitar techniques, tapping is probably the most potent when it comes to making high speed interval jumps, scale movements, polyphony and polyrhythms. Tapping is a legato technique which means it incorporates hammer-ons and pull-offs for tone production. Instead of the usual playing approach using 4 fingers, 8-finger tapping allows you to use up to 4+4 fingers independently (especially useful for extended range guitarists). Being an 8-finger tapper has a lot of benefits and presents us with an ever-increasing range of possibilities.
If you are completely new to 8 finger tapping, before you start, you might want to check my previous article called: 8 Finger Tapping for Beginners.
Let's roll...
There are two main applications for 8-finger tapping:
- Lead style – for playing scale runs, melodic lines, arpeggios, various interval jumps, sequences and so on. This is mostly done by playing one note at a time.
- Piano style – for playing polyphony, piano-like pieces, polymeters and such. For this you need to be able to use both hands independently for different parts at the same time. For example; like a pianist does. The left hand plays the chord changes while the right one plays the melody line.
Most 8-finger tapping players favour one of these approaches over the other, but it’s up to you to try both and find out what inspires you the most.
Before we begin with the examples, I would like to point out that every example in this article is arranged for 6 string guitar even though I am playing 7 string guitar but without using the 7th string.
Now let’s play through some examples that highlight the characteristics of each approach.
1. Lead style
As already said, using 8-finger tapping for playing solos has its advantages. But, to execute the technique successfully it’s important to remove any obstacles before being able to use it efficiently. By this I mean bad posture habits, wrong hand setting, etc. Also, it is vitally important to avoid injury, so if at any point you experience pain, stop instantly. That is a sure sign that you are doing something incorrectly and this should be addressed. This technique is equally effective for playing with a clean sound, a distortion sound or on an acoustic guitar. In all cases, the amount of noise coming from open strings and your hands moving over them, is very noticeable; particularly when playing with distortion. It’s important therefore to make extra efforts in order to suppress this unwanted noise.We shall address this issues of muting a little later. Let’s now look at the first exercise…
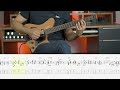
Ex.1 - 4 finger chromatic

Download GP tab - Download PDF tab
This is just an ascending and descending chromatic exercise, four notes per string; your first steps on the fretboard with your tapping hand. Since it’s ascending and descending, you use both hammer-ons and pull-offs. We start off by using all four tapping fingers in order to develop skillsequally in each finger.
It is vital that you have the proper hand setting and to hold your guitar in a way that allows most access to the fretboard. The index finger should be a bit moderately extended as it serves as an anchor point, and for barring in some cases, while the other three fingers should be more arched. To reduce the risk of injury you shouldn’t bend your hands too much in any one direction, just like with your fretting hand. Your tapping hand thumb should be used as another anchor point for stability. This is not always convenient in some situations, such as when you are tapping notes on the lower strings, when your hand can get a little too clenched causing muscle cramps in your thumb base. Nonetheless, try to always keep your hand relaxed, even if you have to keep your thumb off the guitar neck. You may want to refer to some experienced 8-finger tappers like T.J. Helmerich, Chris Broderick, Jennifer Batten... to see this technique in action. Using a mirror can also be helpful in spotting issues, and of course having a private instructor who can fine-tune your technique.
There are ways of silencing your open strings, such as using a dampener, a sock, or any other kind of fabric. However, dampeners prevent you from playing open strings. For this reason you should consider finding other ways of controlling open strings. Usually, this is done by using your left and right hand fingers to mute the neighbouring strings, while your tapping hand thumb can be used to cover the lower strings. Sometimes you may prefer using your thumb as an anchor as described above. You can always experiment with this to find a way that you find most convenient and effective, as long as it serves the purpose. Not all hands are the same and you might not always use high gain distortion. Always practice a piece with the same sound setup you will be using when performing it. Practicing unplugged is generally a bad idea as you will not hear things as you would when playing with distortion.
Moving on to the next example.
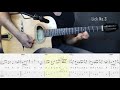
Ex.2 - 8 finger chromatic

Download GP tab - Download PDF tab
Here in Ex.2 we have a chromatic ascending and descending eight notes per string exercise. The same rules as in Ex.1 apply, only now you get to both of your hands for fretting. Personally, I prefer to pull-off inwards, but you are free to do it any way that suits you.
Now we can start moving on to applications of lead 8-finger tapping.
Scales, pentatonics and arpeggios
As for playing scales, the number of fingers used has now doubled, so I like to think that the number of scale positions have quadrupled! This means that it would be meaningless to talk about all the possible scale positions, so we will only work on the basic ones. From this you can customize your own positions. Depending on the number of notes our position has in one octave, we can use various ways of positioning them. For starters, you should think of those positions like they are made out of two neighbouring 3-note (2-note for pentatonic) per string positions, each played by one hand and connected by a sequence of notes.
Diatonic
The basic scale shape would be 3+3 notes per string instead of the usual 3 notes per string in the Extended Scale Positions that we had while using one hand for fretting. This means that for example, when ascending up a scale, after the first 3 notes are played on the 6th string, the next 3 would usually be played on the 5th string. With 8-finger tapping however, we play all 6 notes on the 6th string, so there is no need to play any notes on the 5th string. We can just skip it and continue on the 4th string and so on. Remember though that this is just one approach; you can use various combinations to suit your own style and needs.
Sometimes you will need to repeat notes. If playing high speed, you will usually have to play the same note on a different string to keep the performance smooth. In Ex.3 you can see one of the positions I often use when playing minor scales, modes, etc.
Ex.3 - Minor scale

Download GP tab - Download PDF tab
Pentatonic
The same principle can be applied when playing pentatonics. Now, instead of playing 2 notes per string, we add another 2 on the same string, making 4 notes on one string, skipping the next and so on, just like when playing diatonic scales. You can see how this is done in Ex.4.
Ex.4 - Minor pentatonic

Download GP tab - Download PDF tab
Arpeggios
Again, your approach here depends on how many notes your arpeggio has in an octave. In Ex.5 and Ex.6 you can see some of the shapes that you can use to play four note arpeggios, or sevens.
Ex.5 - Minor 7 arpeggio (4 notes per string)

Download GP tab - Download PDF tab
Ex.6 - Minor 7 arpeggio (2 notes per string)

Download GP tab - Download PDF tab
Finally, Ex.7 is a lick that shows some applications of the things we learned so far and can apply in our lead 8-finger tapping style.
Ex.7 - Final lick

Download GP tab - Download PDF tab
Ex.7 - Final lick - slow
2. Piano style
The piano style is, as you would expect, simulating a piano on the guitar. This means having a similar arrangement of the music as a pianist would; the left hand typically playing chord changes, while the right hand plays the melodic line or an improvisation. Since this is polyphony, you should use a clean sound, though this requires a little extra effort to bring out the notes strongly. It is generally easier to play using mostly hammer-ons, because pull-offs have limitations when it comes to volume and tone quality.
Performing piano style is very different and more demanding than lead style. It requires better separation between the two hands, better motor separation between the fingers, and you need to understand how polyrhythms work. As for arranging, keep in mind that you only have six strings (unless you play an extended range guitar) and that would be the maximum number of notes played simultaneously. Another limitation (generally on the guitar) is of course that you can only play one note on a single string at a time because of the instrument's architecture. This means a little more work in figuring out positions and fingering, you could however compensate for this by using an additional guitar. Guitarists who play this style, like Stanley Jordan tend to tune their guitar all in 4th intervals, which can be useful for building positions, since all of them have same patterns due to equal intervals between open strings.
Here is a little rhythmical exercise just to get you started, Ex.8.
Ex.8 - Bossa nova

Download GP tab - Download PDF tab
Ex.8 - Bossa nova - slow
Now we can move on to something a little more advanced. Ex.9. J.S. Bach’s ‘Bouree’ is an example of a typical piano exercise to develop better separation in your hands, which are playing different melodic lines at the same time.
Ex.9 - J.S. Bach - Bouree

Download GP tab - Download PDF tab
Ex.9 - J.S. Bach - Bouree - slow
Now, time for something different, Balkan folk style lick, typical for Serbian and Macedonian musical heritage. Both hands play at the same time, in the same measures, over an odd time signature, 7/8, only different scale positions and fingering is applied. You can see it in Ex.10.
Ex.10 - Balkan Folk

Download GP tab - Download PDF tab
Ex.10 - Balkan Folk - slow
If you have gone through all the above examples, you should be able to master the next one, Ex.11. It is a blues boogie style riff, which has a triad chord rhythm stabbed over a walking bass line. The fretting hand plays the bass line while the tapping hand plays the chords over it, but they change places when the harmony changes to the subdominant.
The easiest way to learn to do this would be to first practice only the walking bass line until it becomes automatic. Then you can focus on the chords that you play over it. If you are already capable, you can try playing both parts together right away. When you feel comfortable enough with this style, try playing some of your own chops over it. Keep working on it until it starts to sound good and becomes easy to do.
Ex.11 - Blues boogie

Download GP tab - Download PDF tab
Ex.11 - Blues boogie slow
To finish off, I will give you another example, but this time a set of chord changes played with the fretting hand, over which you will play a melodic line. Again, we take the same approach: the fretting hand plays the chord changes with a beat and the tapping hand plays a melody over it, just like on a piano.
Ex.12 - PvZ, Choose Your Seeds

Download GP tab - Download PDF tab
Ex.12 - PvZ, Choose Your Seeds - slow
Ex.12 is my guitar cover of the soundtrack from the video game Plants VS Zombies – track title: "Choose Your Seeds". To learn this, take the same approach as before, first practice your chord changes and rhythm as much as it takes, until it becomes automatic, and then try adding the melodic part to it. Again, if you feel comfortable enough you can do it all together right away.
That’s all folks. I hope that you find this inspiring and that you find enough material for mastering your own 8-finger tapping style, be it lead or piano style, or both. All you need to do now is practice, explore, apply and experiment.
Don’t hesitate to ask any questions below this article or on the forum.
Take care and good luck.
If you want more of 8 finger tapping real world examples, please check my Live4guitar Marketplace profile where you can find full guitar lessons with tabs, backing tracks, explanations and more ...
Here is one of them.
Frederic Chopin - Fantasie Impromptu Op.66


Leave a comment